Inspirations

Compost: Ready-Made or DIY?

There is a lot of discussion among gardeners these days about the benefits of making your own compost rather than buying compost from a landscape supplier, and you may wonder whether or not you should try creating your own. There are pros and cons to DIY compost, and not all gardeners will benefit in the same ways. Understanding how compost is created, what you need to make it, and how much you can expect to produce can help you decide which decision suits you.

There are some good reasons to compost that aren’t necessarily about your garden. Compost can be a great way to use kitchen and garden waste and keep it out of landfills. It is important, however, to note that compost can’t include everything. Garden waste and plant materials such as pine needles, grass clippings, fallen leaves, brush and branches are good bases compost. Likewise, you can add fruit and vegetable scraps from the kitchen, egg shells, tea bags and even coffee grounds. Most paper products are also safe.

Meat, oils, fats, bones, fish and other animal products should not be added to your compost, which means that in order to use household waste in your compost, you will need to separate your garbage. Furthermore, all food products, even those that are safe to leave in your compost like egg shells, fruit and vegetable peels, can attract animals and encourage them to think of your compost as a food source. You will need to monitor your compost and keep it a safe distance from your home to prevent attracting unwanted pests, like possums, feral cats, and even bears.

It is also important to balance your compost. Compost made entirely of leaves and grass clippings will not be as effective as a blend that includes protein and nutrient rich kitchen waste. Good compost also often contains manure, which is unpleasant to collect and handle, and can make your compost smelly while it is maturing. Compost that lacks these nitrogen rich materials will not be able to create the enzymes plants crave.

Compost from Rose Hauling
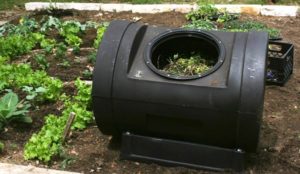
Not all your compost materials will decompose at the same rate, so you will want to “stir” your compost regularly to makes sure that it does not become too dense or too wet. This can be done in a variety of ways: you can use a rake or a hay fork to periodically mix and “fluff” your compost within the composting area, or you can buy a tumbler or make a container from a plastic bin which will allow you to rotate the material as it decomposes. Plastic containers and tumblers can help prevent water from collecting at the bottom of your compost, but also limit the amount of compost you can produce.

You need to monitor the temperature of your compost and keep out unwanted water, so it is important to create a composting area that will be able to maintain heat and stay relatively dry. Make sure your container is properly sized – if your container is too large, it will be difficult to stir the compost and keep it properly rotated. If the container is too small, it will be hard to get the decomposition process started and will take longer for the compost to “finish”.

In order to create enough compost for all your needs, you may need several containers. Assess your compost usage several months before the planting season. If you have a large yard with several flower beds or a substantial vegetable garden, you may need quite a few containers. You may need to stack bins or buy large tumblers to save space on your property. You will also want to check with your HOA or neighborhood association to make sure they allow composting on your property.

Making your own compost can be a great way to dispose of kitchen and garden waste and use them to enrich your potting soil for indoor gardening, but often it is difficult to create the amount of compost needed by the average property owner. Fortunately there are many high quality ready-made compost options available to augment your efforts, allowing you to dispose of trash in an environmentally friendly way without sacrificing the beautiful results obtained from property-wide compost use.

Rose Hauling offers three varieties of ready-made compost the help you fulfill your composting need without dedicating a large portion of your home or yard to composting. You can use your homemade compost for new plantings while and nourish your garden with ready-made compost when you need larger amounts. Visit our compost page to learn more about what we have to offer!

Winter Ready

As temperatures and leaves begin to fall, it may seem like the gardening season is over, but there are still plenty of things to do to prepare for the next season. Prepare for another successful growing season and plant your winter garden with these tips!

Clean Up

Leftover plants can harbor disease and create a place for the eggs of unwanted insects to incubate. The roots of these plants can actually help the soil, but you will want to remove the stems and vegetation above the surface and dispose of them properly. If plants are disease free, you can bury them in garden trenches to add organic matter to your soil and improve your overall soil health.

This is also an excellent time to remove and eliminate unwanted weeds that may threaten to overtake your garden patch. Invasive weeds can be removed completely from moist autumn soil to prevent them from sprouting even more vigorously in the spring. Be sure to destroy roots completely if you choose to add removed weeds to your compost because many weeds can remind viable in compost and come back as part of next year’s crop.

Prepare for Spring

It is common for gardeners to wait until spring to amend soil and improve soil quality, but fall can be just as beneficial if not more so when it comes to preparing next year’s vegetable bed. Dig into your soil and add compost, manure, bone meal, kelp, and rock phosphate. The freeze and thaw of fall and winter help to break down these nutrients and enrich your soil, making it biologically active. Fall tilling can also improve drainage and minimize the effects of extreme weather. In addition to these benefits, you also gain the advantage when the busy spring planting season begins by having much of your preparation done in advance.

Once you have made any soil amendments, cover your garden beds with plastic sheeting to prevent your soil from washing away or draining your amendments away below the active rooting zone. This is especially important for raised beds that drain readily. The sheeting can be removed in early spring, leaving the soil ready to be planted with just a light tilling.

Keep it Covered

Winter Root Vegetables - Rose Hauling, Barboursville, VAPlanting a cover crop not only allows you to continue to enjoy gardening through the winter, but it can also be helpful in maintaining beneficial organisms, bacteria, and creatures like earthworms to keep your soil in fine form and prevent the loss of nutrients. Leaving your soil completely bare will starve these helpful occupants and inhibit the success of next year’s crop.

Plants like field peas and beans do more than simply cover the soil, adding powerful soil-nurturing benefits, including a significant source of nitrogen and roughage for soil structure. Add about ½”-1” of manure or compost to your soil to encourage plants to germinate early in the fall, and watch them as they grow. You want to cut back your peas and beans before they flower to get the most benefits from your cover crop.

There are also several plants that do well and even provide a harvest during winter. Depending on your climate, many of the following will be successful during the winter months:

  • Spinach
  • Lettuces
  • Arugula
  • Asian Greens
  • Chard
  • Kale
  • Mâche
  • Parsley
  • Carrots
  • Turnips
  • Leeks
  • Radish

Winter gardening can be very rewarding, with very little need for weeding or watering. Add compost when planting your winter garden, and feel free to continue to augment your compost on warm, wet days throughout the winter to help boost your plants and your soil.

Divide and Conquer

Fall Bulb Planting - Rose Hauling, Virginia Landscape CenterFall is the ideal time to prune perennials and divide bulbs. Prune herbs and vegetables like fennel, rosemary, thyme, asparagus and rhubarb, and trim shrubs and blackberry canes to help control spread and prevent crossing canes. Raspberry canes should be left standing, as they continue to nourish the crown of the plant into winter.

If you dug up bulbs earlier in the season, this is the time to replant them. If you have bulbs that are still in the soil, dig up the bulbs, separate them and spread them evenly throughout your garden for lush, vigorous results the following spring.

Remove and Refresh

Now is the time to remove old, spent mulch and compost and renew them for winter. Your summer compost is likely spent and ready to be removed. You can use leftover compost to fertilize lawns and landscaped beds and jump start spring growth.

Adding mulch for the winter season protects the soil from erosion and helps prevent weeds from taking hold the following spring. Mulch also helps the soil stay warm and transition into the colder months, protecting the roots of your garden plants and shrubs. The mulch adds fresh organic material to your soil as it breaks down over the winter, super charging beds and landscaping for the coming spring.

A little planning and care now can not only keep your garden neat and tidy through the winter, but can significantly boost your results in the coming year!

A Guide to Using Compost

Compost is a popular and extremely beneficial way to add nutrients to your soil and improve the overall health and quality of plants in your garden.

FINISHED COMPOST

Finished compost should be dark and crumbly and should not resemble any of the composting original materials. Compost generally has a pleasant, earthy smell when properly finished. Insufficiently finished compost can attract pests and can damage young plants, so make sure your compost has fully decomposed before adding it to your garden beds.

HOW TO DETERMINE WHEN YOUR COMPOST IS FINISHED

The simplest way to determine if compost is finished is to have it tested in a laboratory. The report will reveal if the carbon / nitrogen reading is below 20, which is needed for good quality compost. If you’re not going to have it tested make sure that it is jet black before using it in your landscaping projects.

USING COMPOST

There are various ways to use finished compost; sprinkle compost on top of the soil or mix it into your flower and vegetable beds, gently rake compost into shrubbery beds, blend it with potting soil to refresh outdoor plants, or spread it on over the soil on your lawn to amend the soil and improve overall lawn health. Aerating the lawn is recommended when adding compost.

COMPOST IN THE GARDEN

Adding compost to your garden improves the structure and health of your soil. Compost helps the soil to retain moisture and increases earthworm and microbial populations, which act as biological deterrents for unwanted pests. Compost will also provide a slow release of macronutrients, providing a steady supply of nutrients for your plants.

DETAILED USAGE INSTRUCTIONS

Compost - Charlottesville VaAmending Soil
Improve soil structure and nutritional content by working 1–2 inches of compost into the top 3–5 inches of soil.

For Vegetables
Use plenty of compost in your vegetable garden in the fall. Spread four inches of compost on top of the existing bed in the fall, and plan to till it into the soil in the springtime. A handful of compost added to each hole when you’re planting will give roots a boost as they begin to grow. Once plants begin to grow vigorously, you can add a half-inch layer of compost around the base of the plants. “Heavy feeder” plants like tomatoes, corn, and squash can benefit from 1/2 inch of compost monthly—the results will amaze you!

Growing Flowers
In the spring, rake and loosen the top few inches of annual and perennial beds and mix in a 1-inch layer of compost. Alternatively, you can apply a 1-inch layer of compost as a mulch in the fall to protect plant roots from freezing and conserve moisture.

Replenishing Soil Potting Soil
Even the best potting soil is eventually depleted of its nutrients as plants grow. To replenish these nutrients, add new potting soil every year. You can also make your own potting soil using two parts screened compost to one part sand or perlite.

If you have never used compost before, take advantage of our excellent ready-made compost to boost your garden and improve the quality of your landscaping. You will see the results in the beauty and produce in your gardens!

Much Ado About Mulch

Mulch is an endlessly useful product for the gardener or landscaper. Used properly, it can keep moisture in the soil, promote larger, healthier plants, repel bugs, and improve the appearance of your garden or yard. There are many different kinds and lots of ways to use it. You can use this helpful guide to make the most of mulch!

What Kind of Mulch?

Where you use mulch and what you intend to plant in it will help you determine what kind you will need. Double shredded hardwood mulch is aged for use around plantings, and provides an attractive backdrop for your landscaping. Cedar mulches are extremely useful in repelling insects, perfect around established plants like rhododendrons, azaleas, and roses. All mulches need to be aged (dark in color) to prevent burning of young plants.  A blend of hardwood and pine allows you to have the best of both mulches.

If you are covering a large area or a steep slope, you might want to consider single shredded hardwood mulch, as it is less likely to drift. Cedar mulch mats, making it a great choice for high traffic areas or hillsides. Playground mulch is made of high-quality oak chips, making it ideal for play areas, picnic areas, and walkways.

Colored (dyed) mulches can add refinement and color to your landscaping.  Mulching will help with preventing weeds and keeping plant roots moist. Alternatively, if you are covering a large area or preventing weeds outside of a fenced-in yard, coarse hardwood mulch may be your best choice. And if you mulch twice a year, compost is a better choice for fall.  We have a blend mulch mixed with our WDR Compost for year-round feeding of your plants

When to Mulch

Most gardeners prefer to put mulch down in the spring, after the soil has begun to warm. Mulch insulates the soil and helps it to retain moisture, so you get the best benefit once the soil has thawed and has been warmed by the early spring sunshine.

If you have previously applied mulch, remove what you can from the surface before adding new mulch. Remove weeds and any dead plants from the area and rake away the old mulch.  To add nutrients to the soil, work compost into the first inch or two of the topsoil. Add mulch to a 3 inch depth and leave a little space around young plants so they won’t be burned.

Some gardeners like to mulch in the fall as well, although it is even more beneficial to apply compost to ready the soil for spring. Remove any dead plants that have finished for the season and remove the old mulch to prevent fungi and bacteria from being trapped in your garden. Add up to 3 inches of compost to help add nutrients to the soil in preparation for spring.

How Long Does Mulch Last?

In areas like walkways and playgrounds, there is no need to remove and replace mulch every season as you would with a garden or flower bed. Playground mulch can simply be added to as needed for 2-3 years to maintain depth. Walkways and decorative landscaping may need to be replaced every 1-2 years. Cedar mulch can sometimes last as long as 3 years but will discolor with time.

If you want mulch that is low maintenance and lasts, look for material that is coarse, with larger pieces of wood and bark. Colored mulch is dyed, and as time and weather affect it, the color will fade slightly, so if you are intent upon maintaining a certain color, you will want to add or replace regularly to keep it looking fresh.

Mulch can be useful in so many ways! The color and the versatility of mulch can allow you to be creative with your landscape with minimal effort after application.  Mulch also cuts down on weeding and watering time. We offer a wide variety of useful and attractive products to help you achieve the results you want – visit our mulch products to learn more!

Weekend Projects

July is the peak of the summer garden season – vegetables and fruit trees are producing, summer flowers are in full bloom, and your entire property shows the effect of bright sunshine and long, warm days. If you’re like us, you’re also starting to think about fun projects to keep the garden fresh through the rest of the season. Here are a few of our favorite weekend projects to help you refresh your landscaping.

Start by sprucing things up and tidying up the garden. Summer weeds are easy to pull and your efforts are longer-lasting than in the spring thanks to the heat. Shrubs and flowers can get out of hand during a long, healthy growing season, so prune unruly bushes and trees for an instant facelift.

garden mulchIt is a common myth that you don’t need to add mulch during the summer. During the hot summer months, mulch can help to keep the soil moist and prevent evaporation, allowing you to avoid watering your trees and shrubs every day. Mulch also helps to prevent weeds so that your weeding will last longer. Edge your beds to keep them neat and tidy and add a layer of mulch to maintain moisture in plant roots and regulate soil temperature.

Once you’ve tidied up and refreshed your landscaping basics, it’s time to have some fun and try some new ideas to create your dream garden! A quick weekend project that really adds wow to your flower beds is the addition of a wall stone wall as bordering. Here’s how:

• Dig a trench a couple of inches deep and wide enough to fit the wall stones.
• Fill with pea gravel and/or sand and tamp to make level.
• Lay out the wall stones to assess their shapes and sizes.
• Stack smaller stones first.
• Save the largest, most attractive wall stones for the top layer.
• Backfill with gravel.

Choose a stone of consistent thickness — any rock that splits into slabs can be used as stone of consistent thickness — any rock that splits into slabs can be used as wall stones. You can also use round river stones or other rocks. Watch this video for tips and more ideas about how to create stone garden edging:

Another way to make the most of your summer garden peak is to create an attractive garden path that will add charm to your landscaping. Using pebbles, flagstones, or a combination of the two, you can easily create a pretty path in a weekend. Try one of these simple to create projects:

How to Make a Flagstone Path
Create an Enticing Garden Path

Simple touches of color can really make your summer garden pop. Using colorful pots to plant bright, flowering annuals is a great way to inspire a summery feel. Paint a variety of terra cotta pots with Flex Seal spray paint in lots of different colors, put some gravel in the bottom for drainage and top with high quality WDR compost. Try planting bright zinnias, dahlias, impatiens, pansies, or even herbs and flowering peppers to liven up your summer grilling. Don’t be afraid to include lots of different sizes and shapes to create interest.

There is still plenty of time this summer left for projects – enjoy making the most of your landscaping this weekend!